Review of EFE Rail’s 4mm scale HB/Class 74 model
|
Introduction: It is almost ten years since both Hornby and D J Models launched their HA/Class 71 models, with Kernow Model Rail in partnership with D J Models proposing a HB/Class 74 to follow. That Class 74 model never appeared for a reason best not to raise again after so long! To achieve some HBs I therefore bought two resin Class 74 body shells, intending to super-detail them and mount them on RTR Class 71 chassis, but like many of the kits I acquire they still await building! Now, after nearly a decade, RTR models have arrived. Given there was only a fleet of ten of them, and they only ever wore BR blue livery, I still decided to buy three versions, one “E” numbered, one TOPS numbered and one weathered TOPS numbered. Reference materials I have consulted for this appraisal are:
I acknowledge there is some commonality between three of these publications, so there is only verification between three sources. I noticed there are a few discrepancies between both of the scale drawings, numerous photographs and the model. However, in all instances but one the drawings are incorrect and the model compares very well to photographs, scaling measurements and proportions from photographs where necessary. There are, unsurprisingly given Kernow Model Rail’s involvement, similarities between this model and D J Model’s Class HA/71. Packaging: Each model loco comes in a clear plastic “egg box” crate with fold-up sides enclosed within a clear plastic sleeve. This is placed within a stout cardboard box surrounded by fairly dense dark grey foam. None of my three models had parts detached during transit. There are two packs of details, one of tension link couplers, dummy dropped buckeye couplings, pipes and lifting brackets to be added and the other of headcode slides, plus an instruction leaflet. The instructions refer to alternative front valances being in the pack of parts. This appears to be an erroneous repeat from the D J Models’ Class 71 instructions that was not caught by the manufacturers as it is not relevant to this model. Said valances are not missing from this product. The exploded diagram in the instructions, as unfortunately is all too common in model instructions these days, is printed too small to be of much use without a magnifying glass. |
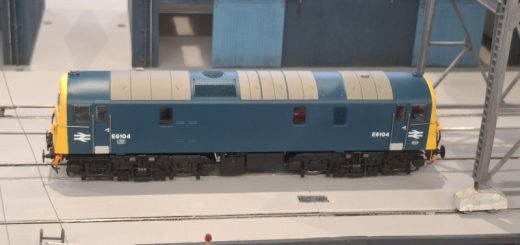
 Number 2 end, “B” side. |
|
Unboxing the models: My first impression was very favourable and encouraging, with nothing standing out as wrong. Looking closer and measuring up, comparing with photographs and drawings, with a few minor exceptions this is an accurate model. Every measurement I did – whether a major dimension or of fine detail, was accurate or within 1mm of scale drawings and published dimensions. All dimensional discrepancies I found are slightly undersize. Let this be a glowing testament to the Research & Development on this model. |
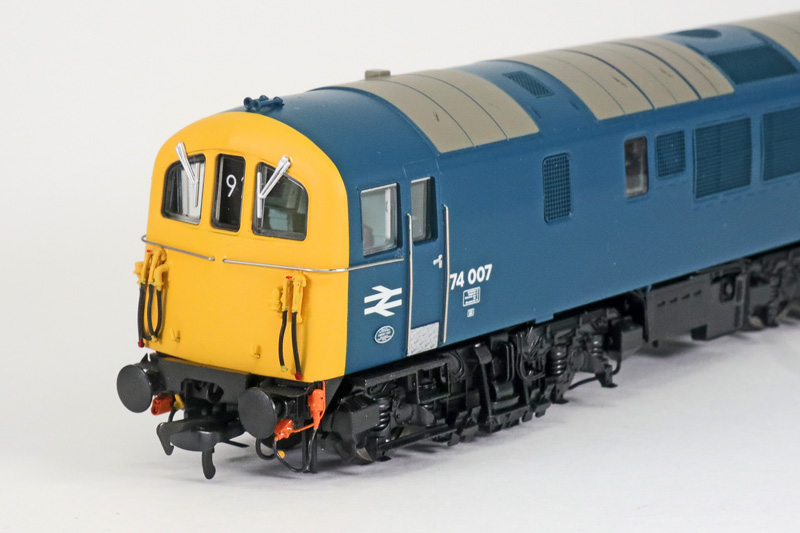
 “A” side |
|
The body: The body casting is a work of art. The body shape is captured well and the moulding is crisp. The see-through grilles (which are obscured behind so the model mechanism is not seen) are marvellous. The bogie mouldings are amazing as they are very well and sharply detailed. The model is factory fitted with a number of separately applied parts, such as the airhorns, windscreen wipers, MU cables and receptacles, lamp brackets, wire door and cab front handrails and various buffer beam details, all very well done. Though there is a tendency for the cab front handrails not to lay horizontally and need careful bending to be level. Being hyper critical I think the windscreen wipers are a bit too thick, but they are at least robust as they are, and the airhorns a fraction too slender. The plates on which the airhorns are mounted are slim and rectangular but drawings and photographs show they should be square, or almost square. The cab side windows and cab door windows are a fraction too narrow and too short. Although the cab doors are the correct width the cab door windows are noticeably too narrow. These slightly incorrect items are as bad is this model gets! They were not noticeable prior to close comparison with drawings and photographs. According to both scale drawings the battery boxes on the model are about 3mm too long, but their length looks right to me according to photos. Scaling dimensions from photos confirms that their length on the models is correct and the drawings are incorrect in this respect. |
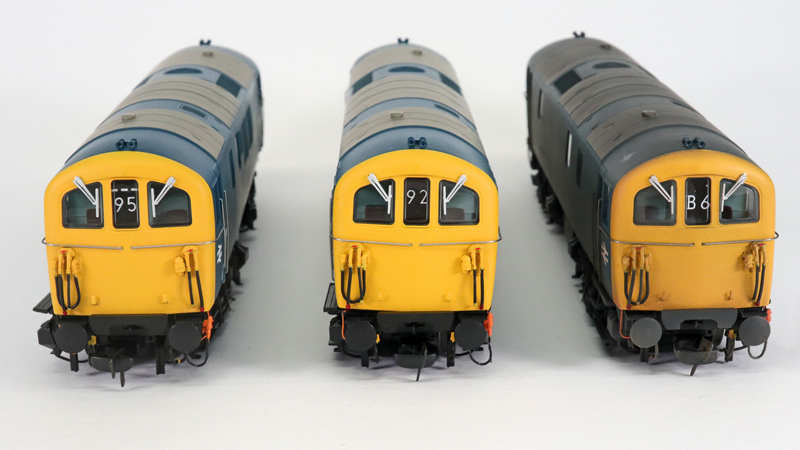
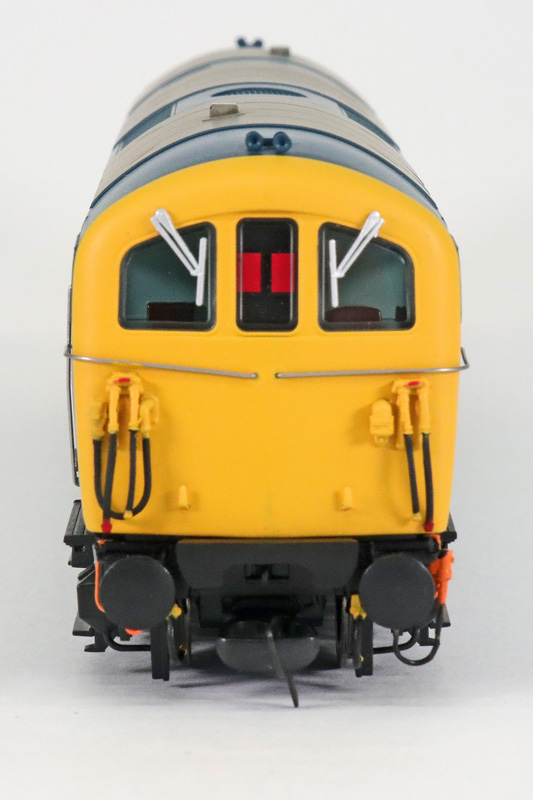 Cab front with a double red blank headcode blind. Note the “wonky” cab front handrails, which will need gently correcting. |
 Cab front with a double white blank and bar headcode blind. The cab front handrails are not so bad on this version, but still need slight levelling. |
|
I felt that the headcode windows looked too narrow on the D J Models Class 71, and my measurement at the time appeared to confirm this. On this model the headcode window width measures as correct, though to my eyes it still looks a tad narrow. I have come to the conclusion that the prismatic effect around the edge of flushglaze window inserts looks particularly prominent on narrower and smaller windows, which can make the windows appear narrower and smaller than they actually are. Is there any hope for slim flat, i.e. non tray-like, window inserts that are fitted into rebates around the interior of window apertures, so there is no prismatic effect? |
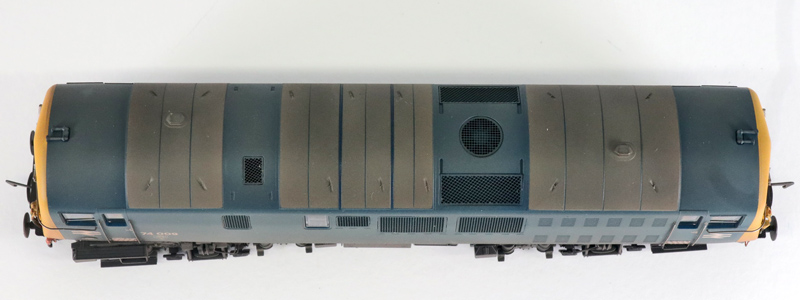
 “B” side |
| Application of the BR blue and warning yellow is of a satin shade, both colours I find credible. The printing of the loco numbers, BR arrows and data panels is sharp and accurate. The cab door scuff plates, cab door handles and builder’s plates are nicely picked out in an aluminium colour. The bogies and underfloor details are self-coloured black plastic, which looks just about acceptable. I am not a great fan of weathering, especially factory applied weathering. For my taste the weathering is a little too heavy and even (though during my long trawl I have seen a few photos of 74s this dirty). However, the weathering does tone down the self-coloured plastic on the underfloor details and bogies and brings out the marvellous detailing very well. I have a growing feeling I need to revise my opinion on weathering! Note that the separately applied parts to be fitted by the modeller also come weathered for the weathered version model. |
 |
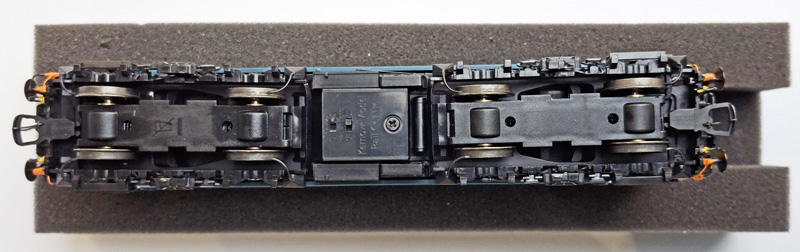 Bogies and underfloor details. |
|
The Headcodes, Chassis and Running: The buffers are sprung, and separately supplied tension lock couplers fit into their NEM pockets easily. However, the rear tails of the couplings, when in the NEM pockets can lightly touch the bogie frame, not that this had any adverse impact on running on my layout. If they do cause trouble, I suspect the end of the tails can be filed or cut down slightly, best done when the couplings are not on the model! The wheels are correctly spoked, though I admit I have not counted the number of spokes to see if this is correct. Separately supplied are four “bogie to loco” brackets, which I think are actually body lifting brackets. As the instructions advise, as these stick out prominently these should only be fitted after checking platform wall clearances. The drawing in the instructions indicating where these should be fitted is too wide angled for their placement to be clear. These brackets are similar to those supplied with the D J Models Class 71 and are intended to be fitted into slots on the bogie, not to the body sides. |
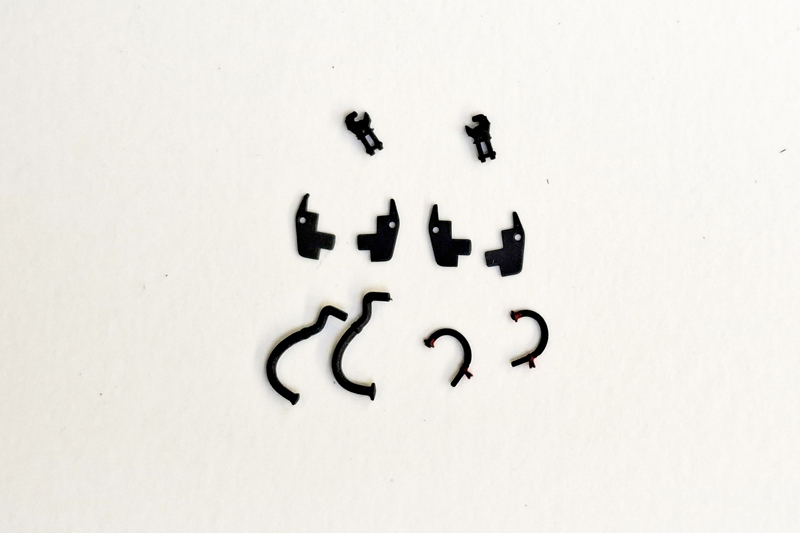 Contents, minus the already fitted tension lock couplings, of the accessory pack of parts to be fitted, as required, by the modeller. |
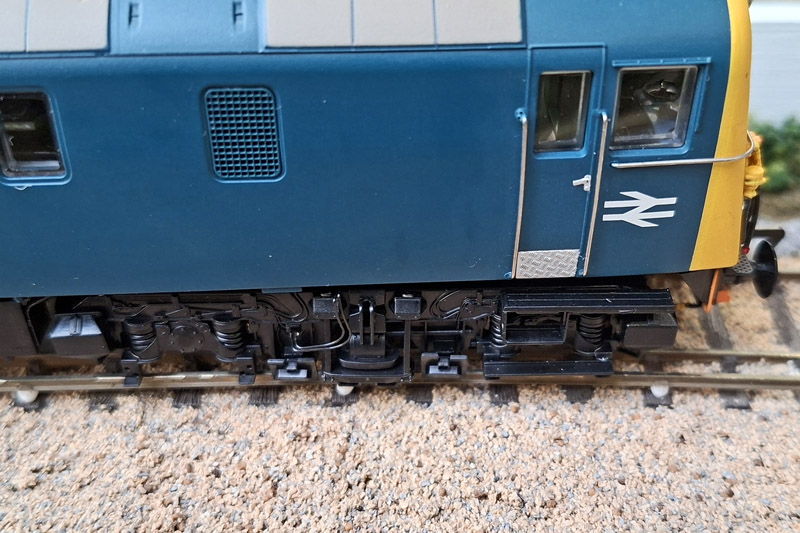 The bogie frames appear to be made to true 4mm scale rather than a OO gauge compromise. Like the majority of 4mm scale Southern Electric models the pickups align outside of conductor rail fitted to OO/HO track. |
The body needs taking off to fit a DCC decoder and to fit the headcode slides. Fortunately, the body takes off easily, just follow the instructions in the leaflet. As they suggest, please be careful of the wiring looms between the body and chassis. During working on the body I held the chassis in a Peco loco servicing cradle. When removing the body, be aware that the bogie frames also remove easily – and accidentally – but I then found them unusually trickly to place back correctly.In my opinion the D J Models HA/Class 71 model had the best and most realistic solution for changeable headcodes, namely supplying printed headcodes on clear plastic slides to be inserted into a slot between the headcode window and light box. The HB/Class 74 model inherits this useful feature. Like on the D J Models Class 71 model the slides are not always an easy fit. On my two “clean” models I found one end to be a loose fit but the other to be tight and needed gentle wiggling until the slide could carefully be pushed fully home. On my weathered model the slides would not fit either end at all. The solution, as found on the earlier Class 71 model, is to use a very sharp knife blade and a metal straight edge to remove an extremely slim slither off one long side on the slides, cutting from the rear of the slide to avoid damaging the printing. However, once successfully slid in I found the slides do not naturally sit vertically within the slot, being tilted back bottom to top. I cured this by cutting very small cubes of packaging foam (of the sort the loco packaging crate comes packed in, though I sourced my cubes from scraps of foam I had kept just in case I eventually found a use for them!) and inserting them between the interior of the cab front and the bottom of the slide. This holds the slides in place vertical and firmly, yet the slides can easily be changed.
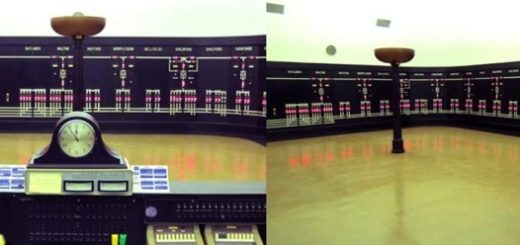
 The supplied headcode slides. Athough we have seen pictures of headcodes with three short bars above extensive research through documentation has failed to reveal what they signify! There are definitions for one or two short bars above, and no bar. |
The supplied headcodes are, according to many photographs, correct for workings HBs ran, and inspection of photographs will reveal other applicable headcodes too. Supplying double white and double blank blinds permits showing accurate blinds for various circumstances. Strangely the 8 in headcode 18 has been printed like a stencil headcode, which given all other numeral and letters are rounded looks odd. Of course the joy of this headcode system is that you can make your own headcode slides. 91 is one not supplied on which I am particularly keen. |
I found all the wheels to be in gauge but 0.25mm larger than the correct diameter according to published dimensions. The loco weighs in the region of 347g, a few grams lighter than the D J Model Class 71 but a considerable 120 grams lighter than Hornby’s Class 71. My three models ran well, but noisily, straight out of the box, but I have yet to try haulage tests. Running them initially gives me an impression of being smooth and reliable, but a tad stiff. After acquisition I customarily test-run powered rolling stock for ten minutes in each direction around my approximately 15 metre oval mainline, but due to concentrating on making notes for this review whilst test running I unintentionally left one model running for 20 minutes in one direction and 35 minutes in the other. The running appeared to be a noticeably smoother after this, though not noticeably quieter, which suggests they need full running in to reach their full potential.
|
Lighting: This model comes with internal lighting for both cabs and both headcode boxes. For DC users there are miniature switches underneath that allow the lighting to be configured. The headcode box lighting is incorrectly labelled “Rear Tail Lamps”. For the cab lighting “OFF” is both cabs – no lights, “ON” directional – leading cab lit. For the headcode boxes “OFF” is directional – leading headcode box lit, “ON” is both headcode boxes lit. It is therefore possible to configure headcode lighting correctly for whether the loco is running light and when hauling rolling stock, but not for when it is pushing a pull-push working. This model is fitted with a DCC 21 pin decoder socket and hopefully DCC can provide completely separate switching of both cabs and both headcode box lighting. Hopefully any reader who has fitted DCC to this model will advise. The yellowness and level of lighting looks credible for the period to me. Unlike some other Southern Electric models the headcode box lighting is not directionally white/red, only white, so there is no way a numerical, etc, headcode can incorrectly be lit red. |
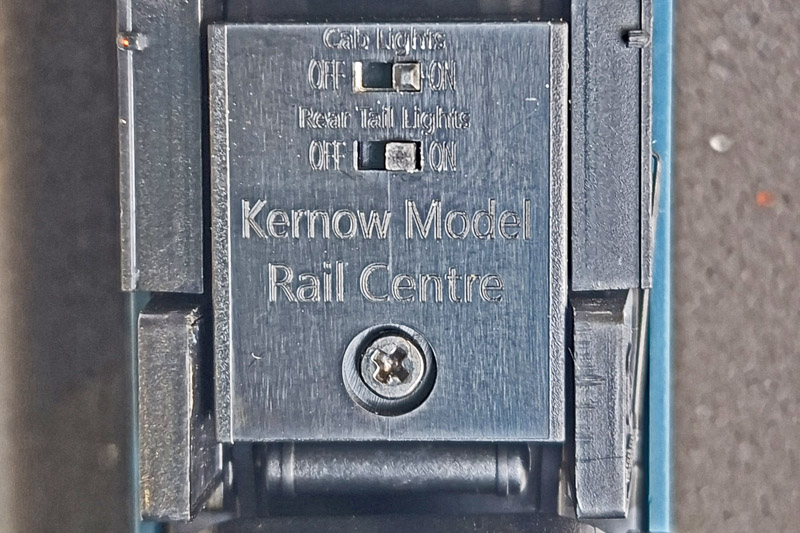 Switching for lighting when using DC control. |
|
Conclusion: This is a well-researched, designed and constructed model which is predominantly accurate, runs well straight out of the box and ought to improve with running-in. At today’s elevated prices I feel it is good value for money too. It is a very welcome addition to Southern Electric system models. Many thanks to Kernow Model Rail and EFE/Bachmann Europe. Colin Duff. Modelling Officer. 30th December 2025. |